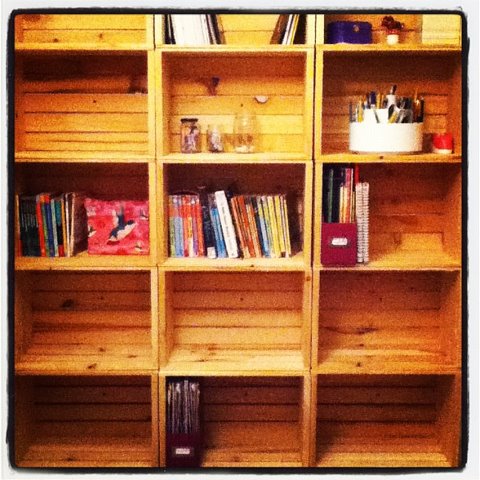
Ah, yes! I need a better picture.
This one was taken when they first went up.
Will try to add more soon.
Once upon a time I browsed Pinterest and came across a picture of some bookshelves made from crates. I knew I needed to have these in my home. And soon.
You see, most of the members of this family are book addicts. Thankfully my husband has floor to ceiling shelves in his office, but that still leaves a lot of books needing homes.
I searched for large bookcases at the store and online, but have you seen the price of those? I mean, cheap shelves that fall apart in a year cost a fortune! Plus, I wanted real wood, not pressed wood. I don't like the chemicals in that stuff! See my post at Keeper of the Home: How to protect your family from the dangers of formaldehyde.
Enter, crates!
Crates are made from real wood. Yes, it's only pine, but it's still wood, not some chemical concoction.
Plus, they cost about $10-$12 dollars at the craft store.
And, if you live near Micheal's, you can print coupons for 40 or 50% off one item every single week.
And that's what I did.
Even though I wasn't sure when or how I would make these shelves, my mother-in-law and I began collecting crates. We both printed a coupon and started hitting Micheal's every week.
My house began to look like a crate distribution facility:
So, let's talk about how to make crate bookshelves.
How to Make Crate Bookshelves
You might call our method the lazy method.
Or perhaps the, we-need-bookshelves-right-now method.
We didn't sand, or stain, or paint.
We stacked up the shelves and my husband put a screw through each crate into the wall. Gravity helps them stay up. I was dubious about the lack of screws. This didn't seem like enough, but they are actually very sturdy. Now, if anyone in your family plans to climb on them, they probably need some further anchoring.
You can anchor the crates to one another first and then screw in to the wall using brackets. If I thought I would live in our current home forever, I would probably do that.
The following posts show more detail about how to make crate bookshelves, if you want to do more than stack them and screw them in to the wall:
- This tutorial shows adding brackets to the back to make them studier
- DIY Vinatge Crate Shelving unit – shows how to add wheels to the bottom
- Retropolitian shows how to sand and stain crates
- Love Mikana – Shows how to make a rolling crate cart/shelving unit
The great thing about the way we did it, is that they will be easy to remove for moving!
We ended up with a large unit in my daughter's room and another one in my and my husband's bedroom. It was such a an easy and inexpensive way to make use of empty space and create some sorely needed storage.
Bonus: These crate shelves have helped my daughter keep her room clean (or shall we say, cleaner) as she now has more homes for her things.
I love my crate bookshelves and am sort of addicted to crates in general. There are so many possibilities when it comes to decorating with crates.
A few more ideas for decorating with crates:
- Upcycle Decorating: How to Decorate Your Home with Wooden Crates
- Creative Uses For Apple Crates in Your Home Decor
- Decorating with Crates
- DIY Wine Crate Coffee Table
Have you ever re-purposed crates? What did you make with them? Or what would you like to make with them?
Sharing at From Pinterest to Real Life at Simple Homemade, Frugal Photo Friday at Simply Rebekah, Weekend Wrap Up at Tatertots & Jello, Craft-O-Manic Monday, Sumo's Sweet Stuff, Crystal and Co., Save Some Green and Creative Me at the Southern Institute.


 →
→
Those look terrific…very great idea!
Love your bookcase. I would love this in my cold room for storing canning; or in my closet for storing folded clothes. It would look so boutique like. Thanks for sharing your awesome bookcase! Cheers.
this is great! i can’t wait to get better shelves for our office one day!
great idea! I just saw someone do something similar on IG and I was intrigued. Thanks for finding all the great links and how-to. I was planning on getting an Ikea Expedit shelf system when we move but I really like the look of this (and the real wood).
Have you ever thought about adding a little
bit more than just your articles? I mean, what you say is important and everything.
But think about if you added some great visuals or videos to give
your posts more, “pop”! Your content is excellent but with pics and video clips, this site could undeniably be one of the very best in
its niche. Awesome blog!